Managing your FoxInCloud Project
This post describes how to adapt and publish your VFP application as a Web Application from scratch.
With FoxInCloud, your application runs the same code on the Web, and on the Desktop as usual.
This is made possible by adapting your application’s code to run in either mode; these adaptations are simple, and many are automated:
- adding new instructions such as testing desktop mode or web mode,
- moving instructions to another method without changing the functionality,
- replacing native instructions such as
DO FORMby calls to functions or methods provided by FoxInCloud.
The free FoxInCloud Adaptation Assistant (FAA, see below) identifies the adaptations in your app., performs as many as possible, and leaves the more complex to your attention. You can open and modify the source code right from FAA, and FAA provides you the guidance on why and how you can do the adaptation.
As the adapted code runs the same in desktop mode, you can adapt your application progressively, while continuing the regular maintenance and evolutions that your daily client service requires.
You can also create a new sub-project with only the forms that you intend to expose to the Web, publish to production, then expand it over time; this project and your regular desktop project share the same adapted files that run in desktop mode side by side with non-adapted files.
All the FoxInCloud resources on which your adapted code relies (installed in home(1) + "tools\ab\") are free to use and distribute with your desktop application. These files are also always available in a public GitHub repository.
Round I: Heat-up
Est. duration: 2 hours
In this first sequence you will verify that you have all the necessary softwares and services installed on your development machine.
1- Make sure you run the latest VFP9 SP2
This VFP command should display Visual FoxPro 09.00.0000.7423 for Windows
? Version()If the last 4 figures are less than 5815, first download and install VFP9 SP2 from the Microsoft site.
Then download and install SP2 Hotfix 3 from the VFPx site.
2- Install FoxInCloud Adaptation Assistant (FAA)
Go to the FoxInCloud download page, click on the FAA screenshot and save awAdapterSetup.zip. Expand this archive into a sub-folder awAdapterSetup\.
Read the text files awAdapter-licence-*.txt and awAdapterSetup-*.txt (brief description of what awAdapterSetup.exe will do on your computer).
Then double-click the VFP executable awAdapterSetup.exe; if ever you don’t have the proper version of VFP installed or associated to *.exe, you’ll get a ‘VFP resource mismatch’ message, then get back to step 1; otherwise awAdapterSetup.exe copies the necessary files to your computer and displays the result as explained in the awAdapterSetup-*.txt text file.
Clicking OK in the final message box automatically starts FAA:
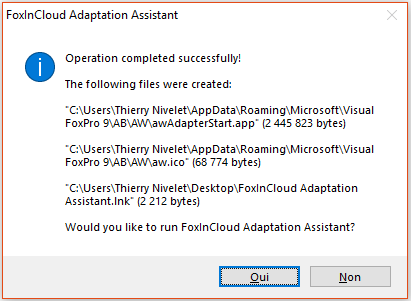 .
.
Whenever a new version is posted on the FoxInCloud site, when starting while connected to the Internet, FAA downloads and installs this new version automatically.
3- Make sure IIS is installed on your development machine
You can follow different tracks to check IIS is installed (translate the strings into your OS language):
- Press the Windows key on your keyboard, type
Windows Features, press Enter - In Windows Explorer address bar, type
control panel, then selectapplications, thenTurn Windows Features on or off - For Windows 10, open the parameters pane, select
Applications, thenApplication and features, then move to the bottom and selectprograms and features, then clickTurn Windows Features on or off
This displays the Windows Features Treeview:
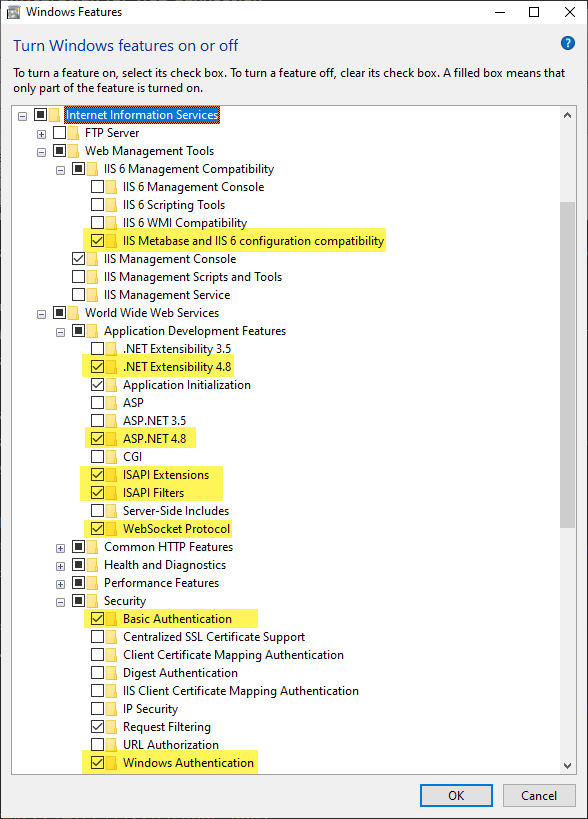
Check the options like indicated in the above image or, if you hesitate or have difficulties in matching your OS language to this picture, select all options 1.
Next, to make sure IIS will have the right to access the folder where your application resides:
- Open the IIS management console (Press Windows key then type ‘IIS’ and press ‘Enter’),
- Navigate to the ‘Sites’ node,
- Click “Define the default values for Web sites”,
- In the ‘Identification…’ line, click the ellipsis
- Type in your user ID and passWord; IIS will use this account to access the folder wherever your Web Application is later installed.
4- Install FoxInCloud Application Server (FAS) and FoxInCloud Web Application Studio (FWS)
Grab FAS for free by signing up your on the FoxInCloud download page 2.
The file you download is a signed MSI-based InstallShield installation package, with all due security protections.
Running the installation installs:
- The FoxInCloud Application Server in
home(1) + 'tools\ab\aw\' - The FoxInCloud Samples in
home(1) + 'tools\ab\aw\samples' - The sample applications in IIS that you can run locally
- A
FoxInCloud Web Application Studioshortcut on your desktop
At this stage you have 2 FoxInCloud shortcuts on your desktop:

- FoxInCloud Adaptation Assistant (FAA)
- FoxInCloud Web App. Studio (FWS)
In the first steps of your FoxInCloud journey, you’ll probably use more the FAA shortcut and concentrate on Adaptations.
After a while, when you start testing your app in the browser, you’ll favor FWS shortcut that provides you all the resources, including FAA from the FoxInCloud menu added to VFP system menu.
Make spend some time reviewing the options offered by the FoxInCloud menu in FWS!
Round II: Review your application with FAA in Copy Mode
Est. duration: 1-2 days (including readings)
(for more details, please consult this complete description of FAA operations)
As explained earlier, FAA performs some adaptations automatically, modifying your application’s code.
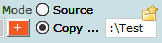
As FoxInCloud’s philosophy is to never break existing code – just add new functionalities on top of existing features – FAA provides a way to check that what FAA does automatically preserves your code’s integrity: the Copy Mode.
In Copy Mode, FAA copies your project and related files to a Test folder 3 and then works on this copy only: FAA leaves your source files unchanged 4.
The only purpose of Copy Mode is to let you check that your desktop application runs the same after FAA automated adaptations; after you do a complete run in Copy Mode you will just drop it in favor of Source Mode.
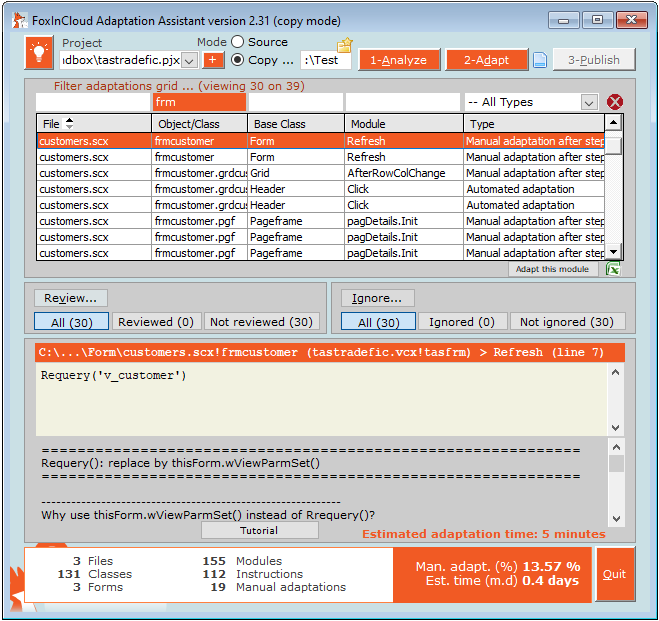
1- Analyze your project copy
Click the red + sign, pick your original project and start analysis.
Completed analysis provides a list of adaptations that you can sort and filter using the controls on top of the grid columns, and statistics at the bottom 5.
The mid pane explains how the current adaptation will be performed (either automatically or manually); you can display these explanations as a VFP program with code sample, and/or view a training video when available.
Please note that the estimated adaptation effort is based on unit times that you can adapt to your project experience by clicking the red line “Estimated adaptation time” down right.

2- Adapt your project copy
This step is why Copy Mode exists: by clicking the 2-Adapt button, FAA performs the automated adaptations on your project’s copy.
After this step, you will open the copy project and run your adapted application in desktop mode to make sure that FAA has broken nothing in your code that could prevent your applications from working OK.
If ever you see something wrong, just shoot an email to support at foxincloud dot com with the original code (unchanged in your original application) and the modified, not working code (in your application copy); we will fix the issue rapidly and post a new version of FAA that will update automatically at your next startup.
To re-run Adaptation on the whole source code, make sure to select the “re-copy…” option in the drop down menu that appears when clicking the 2-Adapt button.
Please make sure to test your adapted application copy thoroughly until you find everything works fine as usual in desktop mode!
3- Publish your project copy
This step is just a way for you to make sure that the Web App publication works fine for you with all required dependencies available; it is a temporary publication that the final Source Mode publication will later override.
At least you can see some of your form display in the browser, which you are eager to see happen…
It can also help you understand how the publication wizard works and train at using it.
After this step completes, you have 2 Web projects named xxxTest and xxxProd, located in the same folder as your copy project.
FAA creates 2 projects to let you later deploy 2 versions of your Web Application on the Production Server, one for Testing and one for Production. You may choose to deploy a single application or both according to your preference.
These 2 projects won’t probably not build completely, especially when using the Trial edition where a lot of FoxInCloud code is gathered in aw.app, causing project manager to complain for missing references.
This is perfectly normal and has no consequence as Trial does not support building an app or an exe.
However you can use these projects a shortcuts to the files generated by FoxInCloud 6, and later start the Server from within the FWS IDE.
Important: from now on, make sure to always open a FoxInCloud Web Application Studio IDE to work on your adapted application and, most importantly, start your FoxInCloud Web Application Server. If anything goes wrong such as a missing procedure or class, select restore environment from the FoxInCloud system menu pad.
Tips and tricks
- Code changes you do in
Copy Modemay be overridden next time you Analyze or Adapt because FAA may overwrite your modified copy by the original file. Change code inCopy Modefor training only, and/or to check manually adapted code runs the same in desktop mode. - FAA project-level settings and options are memorized separately for
Copy ModeandSource Mode: mode, review, ignore, statistics, etc. - You can re-do over and over any of the 3 steps: Analyze, Adapt and Publish
- You can learn from the adapted applications installed with FoxInCloud: just browse the
FoxInCloudmenu to start either desktop, local Web and/or remote Web versions. You have the full source code of these applications for your review.
Round III: Adapt your app Source Code, for real
Once you have successfully completed step II above, you switch FAA to Source Mode and start the final steps that will end up by putting your Web Application into Production.
From now on there’s no need to step back to Copy Mode.
1- Analysis
Est. duration: 15’ to hour(s) depending on your application size
Very similar to what happened in Copy Mode, just let FAA complete the scan.
2- Adapt
a- Automated
Est. duration: 15’ to hour(s) depending on your application size
Click the button and let FAA complete his job:
- Replace native classes by “FoxInCloud Base Classes”: eg.
Formreplaced byawFrm of aw.vcx - Perform the Automated Adaptations identified at step 1
When this steps completes, you should no longer see any adaptation tagged as “Automated Adaptation” in FAA left drop-down list.
b- Manual
Est. duration: depending on your application: see figures provided by FAA

Here comes the part where your development skills come at play.
At this stage you need to filter the Adaptations list on Manual Adaptations after Step 2- Adapt (left drop-down)
We recommend that you process adaptations by type rather than by file; eg. you could start with the call-back adaptations (‘User decision required: …’) that are the most critical. For instance, select one of such adaptation that you can easily test (eg. on an easily accessible form), do it, and test it right away to make sure you’ve fully understood the process.
Also make sure to test your application after a bunch of adaptations to remain sure you’re on the right track.
Nothing changes at this stage and this is perfectly normal: it’s just your application running the same as usual, with slightly different classes and code, albeit ready to run on the Web.
Tips and tricks
- If you KNOW that a module and/or file won’t be used in Web mode, and thus don’t need be adapted,
- ignore it using the
Ignorebutton - choose the
not ignoredoption below: all ignored files, modules and adaptations will disappear from the list
- ignore it using the

- Once you’ve completed an Adaptation and want it removed from the list, you can either re-analyze the project or click
Ignorelike above explained - In case of doubt that FAA documentation and/or video can’t address, ask for free support on any public area such as the VFP forums below 7; please make sure to post the whole code where you have a doubt.
- You may want to fully adapt a couple of forms for your first Web Application tests (see below).
3- Publish
Est. duration: 2 hours
Once you have a couple of forms adapted, you can run step 3-Publish like you did earlier in Copy Mode.
When this Publish step completes 8, you need to review the xxxSets program that FAA has built from the startup code in your desktop application’s main program. Please make sure that this code is OK and edit it as you see fit. Make sure also to read the documentation in this program to fully understand what it is used for.
When typing in your browser: http://localhost/xxxTest/, you can see a a static page built by FAA showing a clickable list of your app’s forms.
After starting your Application Server by typing in the FWS IDE command window do <path to>xxxTest, you can click on any of these links and see your form rendered as HTML in the browser.
Of course this is just a test page, not your final Web App home page! To install your Web App home page:
- Open IIS management console like explained earlier
- Navigate to your app node under ‘Default Web Site’: eg.
xxxTest - Click ‘Default Document’
- Click ‘Add’
- Enter ‘index.xxx’, click OK
Now if you reload http://localhost/xxxTest/ in your browser, you see a sample home page using a ‘sampleIndex’ form (sample login form) installed by FoxInCloud.
To replace this sampleIndex by your own login form, modify command xxxServer, navigate to procedure Index and replace 'App\Sample\sampleIndex.scx' by the name of the your login form. Make sure to open your login form in the VFP designer and:
- set
.wlAnonymousAllowed = .T.: this will allow this form to display to anonymous user, - adapt the login method like in
modify form App\Sample\sampleIndex.scx method txtPass.valid
You could also have a splash form as index form, with a menu or a button calling the login form; in such case both these forms should have .wlAnonymousAllowed = .T.. to know more about all the possible variations, just ask on a support forum 7.
Once you’ve done this step successfully, your web app is up and running! Your Index form can either display a regular VFP menu or a ‘menu’ form with buttons opening the various sub-forms of your app. What’s really important is, just like in a desktop application, to set the starting point as explained above.
Note that the Publish step should run only once successfully; whenever your app shows up in the browser OK, you no longer need to run this step. You might want to re-run step 1 et 2 whenever you add new code to your application (see below). If your code is stable, you can just use FAA as its name states: an Assistant to help you identify and complete your adaptations.
Round IV: Maintain your adapted Source Code
As FoxInCloud adapts, not converts your application, your maintain a single (adapted) code base that you deploy on the Desktop as usual, and on the Web.
Desktop deployment of adapted code does not require any additional license; all the FoxInCloud modules (*.prgs and *.vc?) added to your application are under GNU General Public License and thus can be included, distributed and even used in your application for free.
Whenever your adapted app. needs new features, you can either (1) develop this new code as usual and later run FAA to adapt it or, as soon as you have a fair experience of adaptations, (2) develop this new code the FoxInCloud way:
- Base new classes and objects on the FoxInCloud sub-classes created by FAA (
xxx.vcx) -
Write adapted code; eg.:
- implement a new event, adding 3 ‘magic lines’ as header:
procedure someEvent
if thisForm.wlHTMLgen
  return
endif

&& your regular code starts here- display a message box expecting a user response, add the call-back method as 1rst parameter:
thisForm.wMessageBox('wFormCallBack', eMessageText [, nDialogBoxType ][, cTitleBarText][, nTimeout])
...
procedure wFormCallBack
lparameters tuUserChoice
if m.tuUserChoice = IDYES
  && code processing user response
endif- etc.
Et voilà!
Hopefully this post has given you a complete view on the whole FoxInCloud development process, and helped you understand how to better use the free tools offered by FoxInCloud for adapting your application.
This earlier post further clarifies the why and how behind adaptations.
Have a fruitful journey with FoxInCloud!
-
Selecting all options is OK for a development machine having very little risk to be accessed from the outside world. Carefully selecting the options is mandatory on a Production Server. ↩
-
we will send you a notification email whenever newer versions are available; you can unsubscribe from any notification email you receive. ↩
-
By default, the files are copied to the same folder hierarchy within a
Testfolder located at the root of the same drive. You can change this setting in FAA. ↩ -
When using
Copy Mode, you don’t need to copy your project for FAA! However, if you prefer to copy yourself, you can just run it inSource Mode… ↩ -
Statistics always reflect the current filter; eg. filtering on a file provides the estimated time to completely adapt it; this can help you organize the work of your team members. ↩
-
mainly
xxxTest.prg– Server startup,xxxSets.prg– App Environment Settings,xxxServer.prg– Server classes and settings; and other maintenance utilities in theProgs\folder ↩ -
VFP support forums: https://support.west-wind.com/, https://www.levelextreme.com/, https://www.foxite.com/ ↩ ↩2
-
in what follows,
xxxis the code you chose during the publish step. ↩
tags: strategy development adaptation FAA
Watch FoxInCloud Marketing Videos :: Watch FoxInCloud Technical Videos :: Stay tuned on FoxInCloud Roadmap :: Learn how to use FoxInCloud :: Download FoxInCloud Adaptation Assistant for free :: Download FoxInCloud Web Application Studio for free